Pages

Friday, December 14, 2012

Mittens and Scarves


I made these mittens earlier in the year and recently hauled them out for gift-giving. Although given the warm weather we've been having in southeast Michigan...I think it's almost 50 degrees today...I'm not sure when we will be needing these. Nevertheless, I embellished them and will soon wrap them up and give them away. I love these felted mittens which are great to wear when you're outside walking the dog or strolling the neighborhood.

I'm still having fun experimenting with Photobucket. My poor Facebook friends are getting an overdose of my doctored photos but I'm sure I will soon get tired of it. I still haven't utilized all the special features though but I'm working on it!


I've been addicted to crocheting these flower motif scarves. I dug into my stash of Noro yarns..the beautiful self-striping yarns from Japan. I literally have a whole Rubbermaid bin of different Noro yarns but I'm making a dent with these scarves, which take about 500 yards to complete.

This is the first scarf I made. I'm embarrassed to admit my first attempt was a disaster. I sat down one night and worked up a 10 petal motif. I ended up making 2 rows of these motifs, attaching them as I went along. But when I went to attach the third row, I couldn't make it work. And worse, it took me forever to actually realize why! Being geometrically-challenged, I failed to understand that I needed a 12-petal motif to make it work. I ripped out all the motifs and literally spent hours using the Russian joining method to get usable size balls of yarn. I recently learned that technique...there are youtube tutorials to show you how to attach yarn without tying knots. Noro is perfect yarn for this technique so instead of ending up with dozens of golf-ball size yarn balls, I got 3 good size hanks.


Here's a photo of my scarf in progress with a different flower motif than the previous two. It's a six petal flower. Although it drives me crazy, I don't weave in the yarn ends as I go along. I'm finding as I go to attach additional rows, that I occasionally have made a mistake with either attaching the motif or with the actual flower. I'm easily able to rip out just the one motif, correct it and move on.


This one is my favorite:


Thursday, December 13, 2012

Experimenting

I haven't been happy with the rather lifeless quality of my photos. I have a small point and shoot camera and the lighting has been so bad due to the endless stream of grey days we've been having. So I thought I would experiment a bit with some online photo editing programs. These pictures are from Photobucket. I  especially like the ability to add text to photos. I've been having fun the last couple hours editing various photos in my iphoto library.

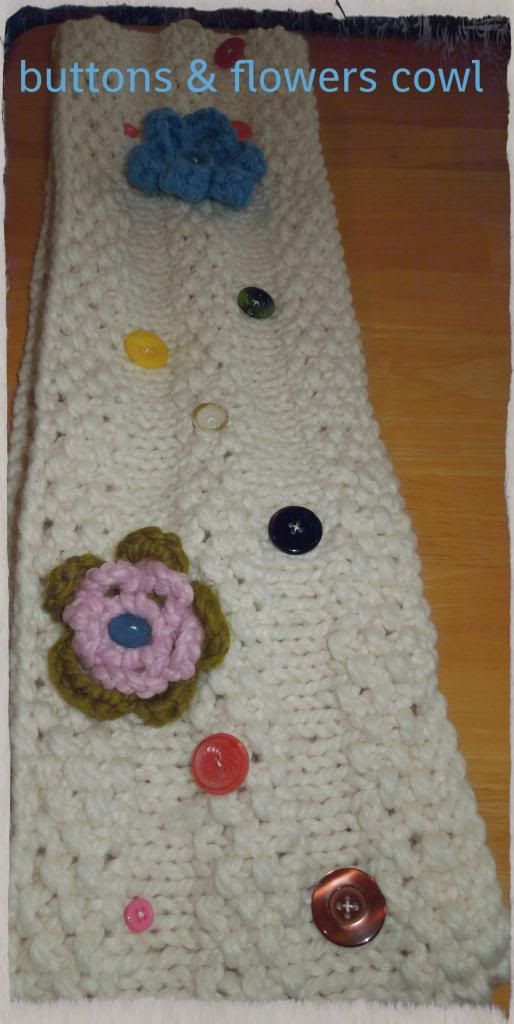
These are pictures of a cowl I'm making for a gift although I'm not quite sure who will receive it. I sewed on buttons from my considerable stash. The flowers can be moved and attached at random. I used the super bulky Lion Brand Thick and Quick but I want to make another one using worsted weight yarn.

However...

I've been in quite a crocheting mood lately so I'm making several flower motif scarves. I'm a little geometrically challenged however and I run into problems when I try to crochet them together as I go along. I'll post some pictures of them tomorrow. I'm excited about the photo-editing possibilities!


Friday, December 7, 2012

Bucket of Snowballs


I have been pretty busy knitting and crocheting Christmas gifts. The one I'm sharing today is a bucket of snowballs that I plan to give to the little guy who loved my dragon so my much. I was inspired to make this after thumbing through an Oriental Trading catalog where I saw white, fabric snowballs you could order. Those snowballs had funny faces on them which I thought about for mine but in the end decided to leave them plain. I went to Jo-Ann's and bought a skein of blue Wool-Ease and a skein of white with a thread of sparkliness which I thought perfect. Here's how I made them:

Bucket of Snowballs

Pattern notes:
 Use a removeable marker when crocheting the rounds and move it up as you go along. Snowballs and bucket are worked in the round in a spiral and not joined by a slip stitch after each round.

To avoid holes showing when you decrease use the invisible decrease method. You can find video tutorials on this process if you Google it.

invisible decrease: without doing a yarn over, insert hook into front loop only of next two stitches. Yarn over and draw up one loop, yarn over and draw through all three loops. Decrease made.

Snowballs measure about 3" across and bucket measures 6" across bottom circumference and is 5.5" high.


Snowballs

With a size US G crochet hook, make an adjustable ring

Rnd 1: 6 sc
Rnd 2: *2 sc into each sc* (12 sc)
Rnd 3: *1 sc in first st, 2 sc in next st* (18 sc)
Rnd 4: *1 sc into next 2 sts, 2 sc into next st* (24 sc)
Rnd 5: *1 sc into next 3 sts, 2 sc into next st* (30 sc)
Rnds 6-8: 1 sc in every st
Rnd 9: begin decrease round, using invisible decrease method described above.
             *1 sc in next 3 sts, sc 2 tog in next 2 sts*
Rnd 10: *1 sc in next 2 sts, sc 2 tog in next 2 sts*
Rnd 11: *1 sc in next sts, sc 2 tog in next 2 sts*
Rnd 12: *sc 2 tog*

Stuff snowball with polyfill and close up with yarn needle.

I was able to make 10 snowballs with one skein of Wool-Ease.


Bucket:

With blue yarn, and G hook, make an adjustable ring.


Rnd 1: 6 sc
Rnd 2: *2 sc into each sc* (12 sc)
Rnd 3: *1 sc in first st, 2 sc in next st* (18 sc)
Rnd 4: *1 sc into next 2 sts, 2 sc into next st* (24 sc)
Rnd 5: *1 sc into next 3 sts, 2 sc into next st* (30 sc)
Rnd 6: *1 sc into next 4 sts, 2 sc into next st* (36 sc)

Rnds 7-14: continue in this manner, working one more sc per round before increasing. You will be increasing 6 sts per round.

Rnd 15: working in back loop only, sc in each st around
Rnds 16-20: working in both loops, sc in each st around
Rnd 21: to make the bucket shape a little better, decrease 4 sts evenly spaced. You don't have to do the invisible decrease here.

Continue working rounds, sc in each st until bucket measures 5.5" or until desired height. Work one row reverse sc for top edging. I get good results when I use a hook one size smaller for this.

Handle: Make a slip knot and chain st for about 15" or desired length of handle. Sc in each chain until the last st, 3 sc in last st, then turn work and do a sc in each loop on the bottom of the original chain. Finish with 3 sc in last st. Work another round of sc and then fasten off. Sew handle to sides of bucket.

Snowflake:
With white and G hook, make an adjustable ring
Rnd 1: 12 sc in ring, st st to join
Rnd 2: sc in same st as joining, *ch 3, skip 1 sc, sc in next st* join with sl st. (6 ch-3 loops)
Rnd 3: *in next ch-3 space, 2 sc, ch 3, sl st in first ch ( picot made) 2 sc, sl in next sc, ch 9, slip in 4th ch from hook, ( ch 4, sl st in 1st ch) twice, sl st in remaining 5 chains and in original sc*

I used white sewing thread to attach my snowflake to the bucket because the yarn seemed too bulky. I also added a row of decorative slip st to the top of the handle.


Monday, November 19, 2012

The Best Chicken Nuggets

My son likes to experiment with cooking which usually works out fine except when he tries inventive ways to make chocolate chip cookies. I've told him that it's hard to experiment when it comes to baking...chemical reactions of the ingredients are crucial, etc...but he's still on the hunt for the perfect cookie...sometime wasting expensive ingredients in the process.  He has had better results with other menu items with one of his best being homemade chicken nuggets. We've experimented with the process and we've come up with a winner. Daniel's high school water polo banquet was last week so we decided to bring our nuggets as our contribution to the potluck. Here's how we make them...described more as a process than an actual recipe.

Put chicken breasts, thighs or tenders in a food processor and pulse until chopped. You don't want to make ground chicken here. I used about 3 pounds of chicken, chopped in about 3 batches, which turned about about 50 nuggets.


I dumped about a cup of flour on a piece of foil and added a teaspoon each of Penzey's Mural of Flavor and Garlic Powder. I don't add any salt.


Next,  I used my immersion blender to scramble 5 eggs in a bowl and lined it up next to the flour mixture.


Then I dumped a cup of panko crumbs on another piece of foil. I ultimately ended up using about 3/4 of a 6 oz. box.


I put the chopped chicken in a bowl and line everything up in order on the counter: chicken, flour, egg, panko. Then I took a small bit of chicken, rolled it in the flour, dipped it in egg, and rolled it in panko. You want to be careful not to make the nuggets too big because it's harder for them to cook evenly.


I put the nuggets on a cookie tray treated with a coating of non-stick spray. Put the uncooked nuggets in the refrigerator, uncovered, for at least an hour. This helps the nuggets keep their shape when cooking.


I cook my nuggets in a little fryer that I happen to have but they could easily be cooked in skillet with oil or even simply baked on the cookie tray. My fryer is little so I can only cook 4 or 5 nuggets at a time. If any nuggets are large, I have to check to make sure they are cooked through because the coating browns up quickly, sometimes before the nugget is properly cooked.


Here are the tasty little morsels. I put them in a glass pan and put them in a warm oven until we were ready to go to the banquet. For a dipping sauce, I mixed together some honey and regular mustard. They were a hit with the boys and were gobbled up in no time.


One of the mothers set up a a candy station, in school colors, with little bags to fill. All in all, a nice way to finish up the season. Daniel has one more year to go and he was voted captain for next season.


Sunday, November 18, 2012

a very happy birthday boy


My friend's son turned seven and we went to his birthday party yesterday. Little Zac loves playing a dragon video game on his mom's Ipad, so I told him this summer that I would make him a dragon. I think he has been waiting for it ever since. When it came time to open presents, Zac made a beeline for my inelegantly tissue-paper wrapped present and ripped it open, He was absolutely thrilled with his dragon, although he did sort of say something about his favorite color being red...I made a blue dragon. I don't think I ever made a gift that was so beloved. He carried that dragon everywhere, outside for the pinata, next to him while eating cake. I plan to make another red one for him. Here's the link to the pattern Choose Your Own Dragon Adventure. It's a fun pattern that has several options for tails, horns, etc so you can truly make the dragon of your choice.


Thursday, November 15, 2012

Bobble Rib Mitts


I liked how much my Bobble Rib Cowl turned out that I was inspired to make some matching mitts. I love to wear fingerless mitts because I can use my fingers. I particularly like wearing then while grocery shopping in the winter. My hands get cold pushing the cart and my mitts keep my hands cozy with fingers free to shop. Here's the pattern for my new mitts.


Bobble Rib Mitts

Materials:
130 yards worsted weight yarn
set of US size 5 double pointed needles
2 markers
tapestry needle

Instructions:

Make 2 identical mitts

Cast on 42 sts and join in the rounds. Purl one round.
Work bobble rib pattern:

Rnd 1: *k 3, p 1, make bobble (p 1, k 1, p1, k 1) into next st, lift 2nd, 3rd and 4th st over 1st st, p 1*
Rnd 2: *k 3, p 1, k 1, p 1*
Rnd 3: *k 3, p 3*
Rnd 4: as rnd 2

Repeat bobble rib pattern for a total of 5 times or until cuff measures 2.5". Work another rnd 1 and rnd 2. Change to stockinette st (knit every row) for 8 rnds or for 1". Begin thumb gusset: K 20, place marker, m 1, k 1, m1, place marker. Continue knitting every round, increasing 2 gusset sts in this manner every 3rd rnd. When there are 13 gusset sts between markers, thread a length of waste yarn through tapestry needle and transfer gusset sts to work later for thumb. Cast on one st to right needle and continue knitting for 16 rnds or until mitt measures 7" from cuff. Begin working a k 3, p 1 rib pattern, increasing 2 sts evenly on first rnd. Work rib pattern for 6 rnds or until desired length.

Thumb: remove waste yarn and place gusset sts on 2 double-pointed needles. With a 3rd needle pick up 3 sts and knit 8 rnds. Bind off thumb sts.


The top cuff can be worn up or folded down like show in this picture.


Wednesday, November 14, 2012

A Very Cowl-ly Christmas

I've been busy knitting cowls lately for Christmas presents. I like wearing cowls myself a lot better than scarves. You don't have those long ends hanging out, plus cowls just seem more cozy in general. I made my daughter the ever popular Gap-tastic cowl last year out of Lion Brand Thick and Quick. Normally, I don't like knitting with super-bulky yarn, but the younger crowd certainly seems to like wearing items made with it. My daughter loved her cowl and wanted me to make more. This year, cowls are on the top of my gift-giving list. Here are some that I've made so far.


This is the Savannah cowl also knitted with Lion Brand Thick and Quick. It's a fun, fast knit and turned out pretty cute.


This is a cowl I designed using, you guessed it, Lion Brand Thick and Quick. I sewed on a bunch of random buttons from my collection and added some crochet flowers that are attached with the buttons. The cowl can be worn with or without the flowers. I will post the pattern for it.


This is a simple ribbed cowl that I knitted using two strands of the sort weight alpaca I bought at the Fiber Expo I recently blogged about. I like it, but wished I had cast on more stitches to make it longer. I cast on 220 stitches and thought that would be more than sufficient but I forget how much ribbing makes a piece contract.


This is another fun, fast knit called Yang, a free pattern on Ravelry from one of my favorite designers, Stephen West. My favorite color is the blue but I didn't realize it would be obscured when folded over! Here's what it looks like unfolded.


I used yarn from my stash to make  Yellow Brick Road and found some great celtic knot buttons from Jo-Ann's.


And finally, I dug around in my stash and found some Classic Elite Renaissance yarn, a worsted weight wool that has some interesting heather-ness to it. I designed the cowl using a bobble rib and eyelet holes that I cinched with 2 yards of hannah silk ribbon I ordered from Etsy.


Bobble Rib Cowl

Materials:
220 yards worsted weight yarn
size US 7 needles
2 yards ribbon
2 markers


Gauge:
 4.5 sts per inch
Cowl measures 21" in circumference and 10.5" high.
Cowl is worked flat in rows and tied in the round with ribbon.

Pattern notes:
To form a nice selvedge stitch, slip the first stitch of every row with yarn in front. Move yarn to back to continue knitting. Use markers to separate the first 4 and last 4 stitches of every row, which are worked in garter st and where the eyelets will be formed on row 3. Bobble rib pattern is worked in a multiple 8 + 3.


Cast on 131 sts. Knit 2 rows. Work bobble rib pattern as follows:

Row1: k 4, place marker, *k 3, p 2, make bobble (p1, k1, p1, k1) into next st, take the 2nd, 3rd, and 4th sts over the first st, p 2, * k 3, place marker, k 4


Row 2: k 4, p 3, *k 2, p 1, k 2, p 3,* k 4


Row 3: k 2, yo, k 2 tog, *k 3, p 5,* k 3, sl marker, k1, yo, k 2 tog, k1


Row 4: as row 2


Repeat these 4 rows until cowl measures 9". Then work 1.5 " in straight garter stitch. Weave in yarn ends and work ribbon through eyelet holes.


Thursday, November 8, 2012

Little Knitted Gift Bags


I absolutely love wrapping gifts. My family has teased me for years for the huge collection of wrapping paper I have. I buy it on sale after the holidays.  I even packed up my collection of several rolls of brand new wrap to take with me when we moved several states away. Lately, though, I have been wrapping my gifts in plain white tissue paper that I get in bulk at Costco and embellish it with crocheted ribbons and flowers. I will post about that later, but today I wanted to share my little knitted bags. I recently made several of these out of leftover sock weight yarn but you could use any weight yarn and actually any number of stitches.  These bags are perfect to wrap gift cards or jewelry. You could make them bigger to fit larger items.


I embellished the bags with buttons from my stash.  My favorite one is this plain gold bag with a Christmas button I recently bought at Jo-Ann's.

Little Knitted Gift Bags

Materials:
oddments of fingering weight yarn
set of US size 1 or 2 double-pointed needles
various buttons for decoration

Gauge: not really important
7 sts = 1 inch
Bag measures 4 3/4 inches by 3 3/4 inches

Cast on 60 stitches and divide evenly on 3 double-pointed needles. Join in the round, without twisting.
Rnds 1-12: knit
Rnds 13-18: *k2, p2*, repeat around
Rnd 19: work eyelet round, *k2, yo, p2 tog*, repeat around

Knit every round for 3 more inches or until desired length. Turn bag inside out and work a 3 needle bind off to close bottom.

Use a length of ribbon or crochet a draw string to thread through the eyelet round. Embellish with buttons.


Tuesday, November 6, 2012

a package arrives

I am a frequent customer of Jimmy Beans Wool. I absolutely love their Wool Watcher feature, accessed by clicking on the puppy dog icon up at the top right of the page. A particular item, usually a skein of yarn in a one colorway is featured on sale for a limited amount of time or until it is sold out. I have this feature bookmarked on my computer and check it several times a day. One reason I order so much is that the shipping charge is only $4.00 or free if you spent $75. You can choose to hold several Wool Watcher purchases for shipping on Friday and only pay $4.00 even if you order multiple times that week. I received a large box yesterday and I was like a kid at Christmas. I love this slogan on their boxes.


I ordered several skeins of Tobaggan, a bulky Classic Elite yarn, to make cowls.


But there are other goodies too....Malabrigo Twist, Lorna's Lace Honor, Blue Sky Alpaca Worsted...I will be busy in the coming weeks.

Unlike many women, I don't like to shop. I get bored at the mall after going into two stores. But I sure love buying yarn. Especially when I get it on sale!


Monday, November 5, 2012

a sweater in the making....

Usually, I don't knit sweaters. Even though I have a considerable stash of sweater-quantity yarn...courtesy of the three years or so I worked in yarn shops...I don't have the attention span to complete a sweater. I like to knit smaller items. One of the reasons I like to knit so much is that I'm intrigued to see how an item turns out. It fascinates me that a knitter can turn a string of fiber into a usable item. But once the design takes shape, I'm ready to move on.

But back in the summer, my daughter found a loose pattern in the basement. It probably dates from the 1980's. She asked me to knit the drop sleeve sweater for her, so I ordered some sale yarn from WEBS. It's a pretty boring knit, about 59 cm of stockinette, so I haven't gotten very far in the ensuing months. She's been bugging me about it, so I've retrieved it from the bottom of my project basket.


She recently accompanied me to an out-of-town water polo tournament with my son's high school team, and I promised to work on her sweater. I taught her to knit when she was about 8, but she never really took to it. Nevertheless, she does remember how to do the knit stitch, so we took turns while we sat in the stands between games. She worked the knit rows and I did the purl rows.


There was a little variation in tension, but hopefully that will even out when I block it. We had fun, but I don't think she will take up knitting more permanently...she just wants her sweater.

The tournament weekend was a couple of weeks ago, and I haven't touched the project since. I saw it guiltily last night and dragged it out of my bag. I got several inches done but I have to knit an identical piece for the back. At least I'm on a roll....sort of...


Saturday, October 27, 2012

Fiber Expo


Chianti, 7 months, goes for a walk
I look forward to the Fiber Expo every fall. Held at the Washtenaw County fairgrounds, it features booths chalk full of fibery goodness.  This year, I noticed several booths featuring beads, ribbons and buttons. There are angora rabbits, alpacas and a camel.

I made a beeline to one of my favorite yarn vendors, Cakewalk Yarns and bought three skeins of fingering weight. Then I headed to another one of my favorites, Weaver's Loft
where I stocked up on large hanks of alpaca...just devine. My good friend Peggy and I always spent a lot of time in this booth, but she moved out-of-state with her family and the Expo isn't quite the same without her company.
The bags of wool and the colorful braids of roving always make me wish I knew how to spin. I'd love to learn some day.


Plenty of buttons and ribbons to be had.


One year I made the mistake of walking into the gun show instead of the yarn expo. A completely different crowd.


I ended up purchasing five skeins of alpaca from Weaver's Loft and three skeins of fingering weight yarn from Cakewalk. Also...ceramic buttons made in Swaziland that I plan to use on a cowl that I'm nearly finished knitting. I think I will start Stephen West's Daybreak shawl with the black and ivory alpaca while catching game 3 of the World Series tonight. Here's hoping that the Tigers get a win.